Yogic Breathing Techniques: Pranayama
Three Stages of Pranayama Practice
Physical Level (Beginner Stage):
Involves the physical effort required to perform the breathing exercises correctly.Mental Level (Intermediate Stage):
Focuses on understanding and absorbing Prana — the vital life force — into the body.Spiritual Level (Advanced Stage):
Involves mastering the ability to direct and circulate this vital energy consciously within the system.
Ideal Conditions for Practicing Pranayama
Perform pranayama early in the morning at sunrise, or in the evening at sunset, always on an empty stomach.
These practices can generate internal heat. If you experience this, it’s recommended to do Shavasana (corpse pose) afterward and take a lukewarm shower.
If you feel dizziness or headache, stop immediately and rest in a child’s pose (Shashankasana) or similar calming posture.
Types of Pranayama (By Technique)
Classification of Pranayama Techniques
| Forceful Breathing | Sound-Based Breathing | Lung Capacity Enhancers | Cooling Breaths | Finger-Controlled Breaths | Regulated Breaths | Power Breaths |
|---|---|---|---|---|---|---|
| Kapalabhati | Ujjayi | Viloma | Sitali | Suryabhedana | Sama Vrtti | Plavini |
| Bhastrika | Bhramari | Anuloma | Sitakari | Chandra Bhedana | Vishama Vrtti | Murchha |
| Pratiloma | Nadi Sodhna |
🧘♂️ Preparing the Body for Pranayama
Before beginning Pranayama practices, it is essential to prepare the respiratory-muscular system. This includes increasing lung capacity and strengthening the muscles involved in breathing.
The main respiratory muscles are the diaphragm and the intercostal muscles.
🫁 How Breathing Works
Inhalation begins with the diaphragm contracting, which increases the vertical volume of the thoracic cavity, allowing air to reach the lower parts of the lungs.
Next, the external intercostal muscles contract, expanding the chest horizontally and allowing air to fill the middle regions of the lungs.
Finally, accessory breathing muscles in the neck become active, aiding in the filling of the upper parts of the lungs.
One of the foundational aspects of Pranayama is to learn and master three breathing techniques:
Abdominal (diaphragmatic) breathing
Thoracic (chest/intercostal) breathing
Clavicular (neck/shoulder) breathing
🫧 Abdominal Breathing (Diaphragmatic Breathing)
The goal of abdominal breathing is to strengthen the diaphragm and improve its function. Training this muscle involves a progression through three stages:
🧘♀️ 1. Abdominal Strengthening Exercises
The following paired asanas (performed 10–15 repetitions each) strengthen the diaphragm and abdominal muscles. Strong core muscles support deeper breathing and allow greater expansion of the lower lungs.
Hand to Knee Movement + Relaxation
Shalabhasana (Locust Pose) + Balasana (Child’s Pose)
Bhujangasana (Cobra Pose) + Balasana
Swan Pose
Abdominal Contraction and Release
Navasana (Boat Pose) + Relaxation
Dhanurasana (Bow Pose) + Setu Bandhasana (Bridge Pose)
🛌 2. Practicing Abdominal Breathing While Lying Down
Lie on your back with your feet hip-width apart and knees bent so that your lower back rests comfortably on the floor. (If needed, place a folded blanket or cushion under your lower back to support it.)
Place the palms of your hands on either side of your navel, with fingers pointing toward each other.
Focus on your abdominal muscles under your hands.
As you inhale, gently expand the abdomen upward and outward.
As you exhale, release and soften the abdomen back toward the floor.
Important notes to observe during the practice:
a) Avoid straining or shaking the abdominal muscles during expansion.
b) Feel the expansion of the belly under all fingers and palms.
c) Perform the movement slowly and smoothly.
⏱ 3. Progression to Seated Abdominal Breathing
Practice abdominal breathing while lying down for one week to build awareness and strength. Once comfortable, gradually shift to seated positions for continued practice.
🧘♀️ Abdominal Breathing Practice in a Seated Position
After gaining confidence with abdominal breathing while lying down, the next stage is to practice it in a seated posture. Below are two foundational exercises:
🔹 Exercise 1: Seated Abdominal Breathing (Basic Awareness)
Sit in Virasana (Hero Pose) — knees folded under, spine upright, and shoulders aligned with the hips.
Gently tuck the chin toward the throat (Jalandhara Bandha) so you can comfortably look down at your abdomen. Then close your eyes.
Place your right palm on your abdomen and your left palm on your chest.
As you inhale, gently expand the belly forward and outward.
As you exhale, release the belly inward and soften the muscles.
Continue this natural rhythm of inhaling and exhaling.
🧘♂️ Important:
Ensure that only your right hand (on the abdomen) moves during breathing, and the chest remains still throughout the practice.
🔹 Exercise 2: Deep Rib Expansion (Intercostal Breathing Awareness)
Sit comfortably in either Virasana (Hero Pose) or Siddhasana (Perfect Pose). Keep your spine upright and your chest facing forward.
Gently tuck your chin toward your neck and close your eyes.
Place your hands on the lower ribcage:
Let the index and middle fingers rest under the chest.
The thumbs should extend toward the back of the ribcage.
The remaining fingers naturally rest over the floating ribs on the sides.
This hand placement allows you to feel the full movement of the lower ribcage during breath.
With each inhalation, gently expand the ribcage under your hands — forward, sideways, and if the inhale is long enough, slightly backward under the thumbs.
The upper chest stays still, while a gentle movement forward in the abdomen may be felt.
With each exhalation, feel the ribcage contract, the abdomen relax, and the lower ribs draw inward under the fingers.
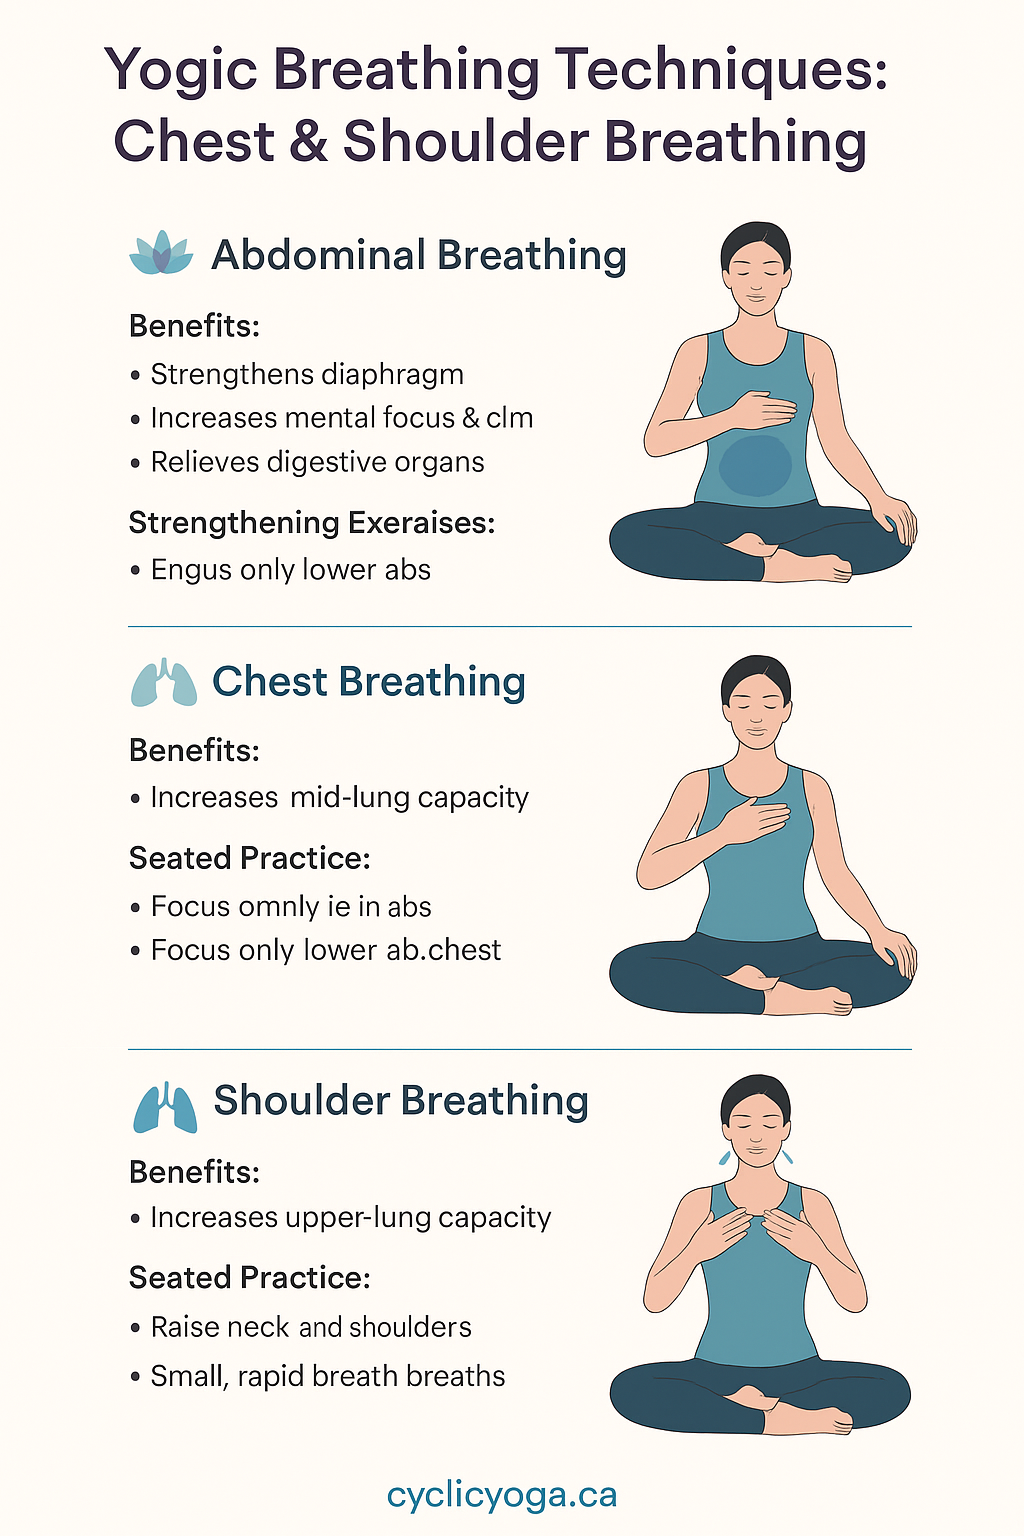
🧘♂️ Yogic Breathing Techniques: Chest & Shoulder Breathing
🌬️ Benefits of Abdominal Breathing:
Strengthens the diaphragm, making the breath deeper and activating the lower lung alveoli.
Increases mental focus and emotional calm.
Beneficial for those suffering from insomnia or nightmares.
Practicing it before sleep can lead to deeper, more restful sleep.
Helps improve hemoglobin levels, making it useful for those with anemia.
Stimulates digestive organs (stomach & intestines), releasing built-up tension.
💡 Tip: If you feel bloated or heavy from overeating, this breathing method can help ease the pressure.
💨 Chest Breathing (Intercostal Breathing)
The purpose of chest breathing is to strengthen and improve contraction of the intercostal muscles, allowing more air into the middle section of the lungs.
🔹 Step 1: Strengthening Exercises for Intercostal Muscles
Repeat each 3 to 5 times to build strength in chest and rib muscles.
Arm stretches with clasped hands, palms facing inward
Arm stretches with clasped hands, palms facing outward
Up-and-down arm swings with fists closed
Forward bends from a standing or seated position
Arm motions as if slicing through water
Chest-opening movement using both arms
🔹 Step 2: Practicing Chest Breathing While Lying Down
Lie on your back, legs straight, hip-width apart.
Place your right hand on the chest and your left on the abdomen.
Slightly pull the abdominal muscles inward to restrict lower breathing.
Begin inhaling, directing the breath to the mid-lungs (chest area).
During exhalation, relax both the abdomen and chest.
🧘♀️ Key: During inhalation, the abdomen should remain still while the chest expands.
🔹 Step 3: Chest Breathing While Seated
Sit in Virasana or Siddhasana with an upright spine and open chest.
During inhalation, draw the abdomen inward and expand the chest forward and outward.
During exhalation, gently release the chest and abdomen.
Focus on movement in the chest only — abdomen should remain still.
🌬️ Benefits of Chest Breathing
✅ Increases lung capacity, especially in the middle lobes of the lungs.
🫁 Shoulder Breathing (Clavicular Breathing)
Shoulder breathing is shallow breathing involving upper chest and collarbones. It naturally activates at the end of deep inhalation, or in moments of stress, anxiety, or oxygen deprivation.
This method helps activate the upper parts of the lungs, allowing for more complete breath capacity.
🔹 Step 1: Exercises to Strengthen Neck and Shoulder Muscles
Lifting and lowering shoulders repeatedly
Turning the head side to side and lowering chin toward shoulder
Nodding head up and down
Isometric resistance exercises for neck strength
🔹 Step 2: Practicing Shoulder Breathing While Seated
Sit in Virasana, keep your spine straight and chest open.
Place your hands on the upper chest:
Thumbs rest on the shoulder joints
Fingers on the collarbones
Elbows stay close to the body.
Slightly engage the abdominal muscles and begin very short, quick breaths using only the upper chest and neck.
💡 Imagine air reaching only up to the base of the throat.
🌬️ Benefits of Shoulder Breathing
✅ Enhances upper lung capacity and improves oxygen access in the upper lobes.